
The Uganda Police Force (UPF) has today launched an online service that will enable many Ugandas seeking to go and work abroad to have an easy way to get a certificate of good conduct and a police clearance certificate online. The service also applies to other sectors like drivers who work on Uber or Safeboda platforms and is effective 17th May 2021.
The recent realities of the threat of the spread of COVID -19 and to minimize congestion at the Directorate of INTERPOL Headquarters’ which is mandated to issue certificates of good conduct and police clearance certificates.
Let’s get into the process of how to apply for a certificate of good conduct and a police clearance certificate online.
- Visit UPF website and click on the Services tab and select the Certificate of Good Conduct option.
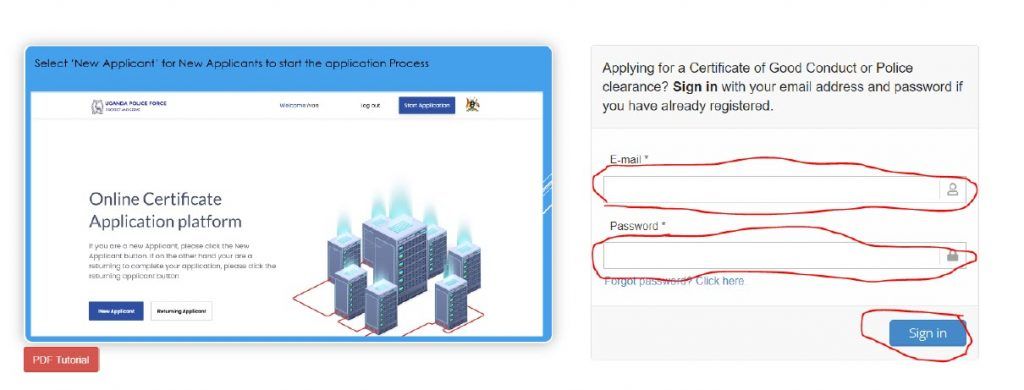
- Click on the Register button to create an account as shown below. (This applies to applicants using this application for the first time and have never created an account in this application, those with accounts click the Login Button). You require an active email to Register.

- Please agree to the terms and conditions by clicking in boxes on left and click next until you click the Agree button.
- Fill in all the required fields to enable you create an account as shown below.

5. Open your email to activate your account. A link will be sent to you where you are required to click it. Without clicking this link your account will not be activated and you will not be able to login.

6. After activating your account, the system will open a login page where you are required to login in with your created account as shown below.

7. In case you forgot your password, click on the forgot password link to reset your password.

8. After logging in, the system will provide you with three (3) options as shown below.

It should be noted that;
- New Applicant is for those who are starting the application process. This process will take you up to a level of making payment for the service you are applying for.
- Complete Application is for those who have gone through part 1 (New Applicant) and have already paid for the services they are applying for.
- Returning Applicant is only for those who are renewing their certificates after expiring.
STEP 1
9. After clicking New Applicant Button, fill in all the personal details and all field with red star are mandatory. After entering all information click Proceed Button.

- The system will open a payment page as shown below. Choose the service type you are applying for and the mode of payment. In the modes of payment, “Cash” means payment over the Bank counter. After click the Apply for service Button.

11. The system will provide a preview of the data you entered to confirm that it’s the correct information. Where the information in the preview window is incorrect click the Back button to edit your data. But where the data is correct, then click the Submit Button.
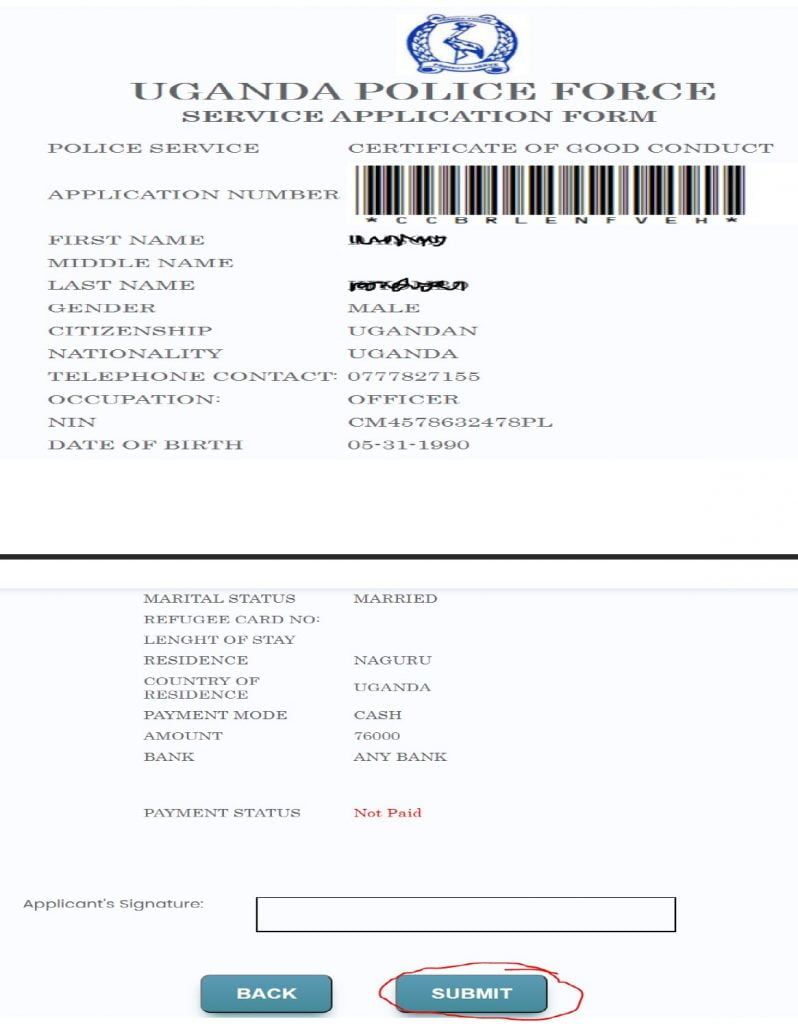
13. The system will generate a payment slip for you with a Payment Registration Number (PRN). Print it and take it to any bank for payment or pay with any other payment mode you chose in the previous stages. You will also receive an email with PRN details.

STEP 2
1. Login in the system using your email and password you created as shown below
2. The system will open the options page and choose the Complete Application button as shown below to proceed to booking.

3. Select the application you paid for and click proceed as shown below.

4. The system will open a page with different options to choose from depending on what you wish to do as shown below.

- Choose the Book for an Appointment option to book for your preferred date you wish to go to Interpol for Fingerprint capture. Select the date from the Calendar and click the Confirm Booking Button. You will receive an email confirming the date that you have selected together with the requirements to go with.

6. After Booking, click the Back to Main Page button for more options as shown below.

7. Choose Print Receipt option to generate a receipt.

The receipt below will be generated after clicking the Generate Receipt Button.

8. Go back to main page and select the Application Preview option

Also print this preview as it will be required on the day of your appointment.

9. Go to the main page and choose Application Status option. This will help you to know the stage at which your application is at.
